The system – the goal
We want to offer to the customer the possibility to choose some sleeves, hoods in the DTG system.
On all DTG products, for SOM/SUA band, we want to offer the possibility to print “SOM/SUA logo / deisngs”.
We also want to offer the possibilty to disable SOM/SUA Logo for some products.
We also want to setup special sleeve/hood for specific products. For example, sleeve for “archspire” design on Archspire products.
We want a different sale price for SOM/SUA design or Band design.
We want to enable multiple possibilties for selecting a sleeve/a hood : we can setup as many “sleeve design” per product. In the following example, there’s 3 differents sleeve available on the selected hoodie. In that example, I just added 3 designs for “sleeve/hood” , there’s no “band design” (but It could be).

We also want to enable switching Front and Back (and we also want to disable switching front / back if we decide that).
We want a way to enable printing on different support, with differents sizes (mug, wallet, flag, short, pants, etc …). That means the original design should offer different “printing size” (the picture used to print on a Mug is totally different that the picture used for a short, the “ratio” is totally different.
We also don’t want to enable the print of a “main” design on the sleeve. We want a way to force it on the front or on the back.
In the same way, we don’t want to let the user to print the sleeve design in the “Front zone”.
We can also imagine that the user want to print only the front, without the back.
Last point, we also want a way to print differently in certain case. Below, for a totebag and a “pocket”, there’s no sense. We want a way to automatically “center” the design :

To allow all of theses functionnalities, I had to set “a lot of parameters”. And finally, because there’s a lot of possibilities, It can’t be <very easy> to set all parameters to obtain the result you have in mind. It’s why I created this documentation, that could help!
Generality
To obtain that result, I had to <abstract> some concepts. It’s the difficult part to understand.
We have a lot of different blank merch, with many colors, with different “print zone”.
To have a finalized product in an order, the customer have to select a Blank Merch, and then, according to its “available print zone”, we can select “what design part should be printed in the available zone”. A good example is a long sleeve design can’t be printed on a short sleeve or on a hood.
To manage that, I wanted to do a strong separation between <blank product> and <printable product>, with no “link” between them : in the first version of the system, a design (part of Printable product) was containing a “printable zone” : front or back.
That was not optimal for multiple reasons :
- How the customer can swap between front/back if the design specify “I want to be print on the front” => impossible.
- If the design was set to “Front”, what happens If a day we want to print it on a Mug ? There’s no Front, no Back, etc …
Finally, a design can’t specify “physical zone” like “front”/”back”. Instead of that, the design should define the picture to use when printed on “classic ratio” or “short sleeve ratio” or “long sleeve ratio”, etc.
Blank products
A blank product define multiple views.
A view can hold multiple “Printable Zone”. In real life, we actually set only 1 printable zone in a view. But that could be use to speficy a “bottom zone” under the “front zone”. That could allow the user to print a logo at the bottom of a shirt. But in the fisrt step, we will not use that.
A zone is definied by some properties :
- a Ratio
- a Type (Main / Accessory). It’s use to maje a different between a main design with a sleeve. A zone defined to hold accessories can’t be filled with a Main design.
- an associate printer type (in case we start doing other print like <sublimation>, for now, the only type used is Espon DTG Print)
- a Name (front/back/sleeve, etc)
- an Overload (rare case, only used to managed the “center” on a totebag actually)
- some restrictions => for example, on a hoodie, the front zone should specify “there’s a pocket”. On the back, that restriction doesn’t exist (there’s no pocket). So a design that could be printed everywhere except on a “pocket zone” could be printed on the back, but not on the front.
Here is a basic setup for a hoodie:

Printable Products
A printable product represent a print on demand product on the shop.
A printable product contains a list of printable design :
- a least a main design (two main design sometimes, especially to allow front/back on a shirt)
- additionnal design => many accessories (sleeves, etc …).
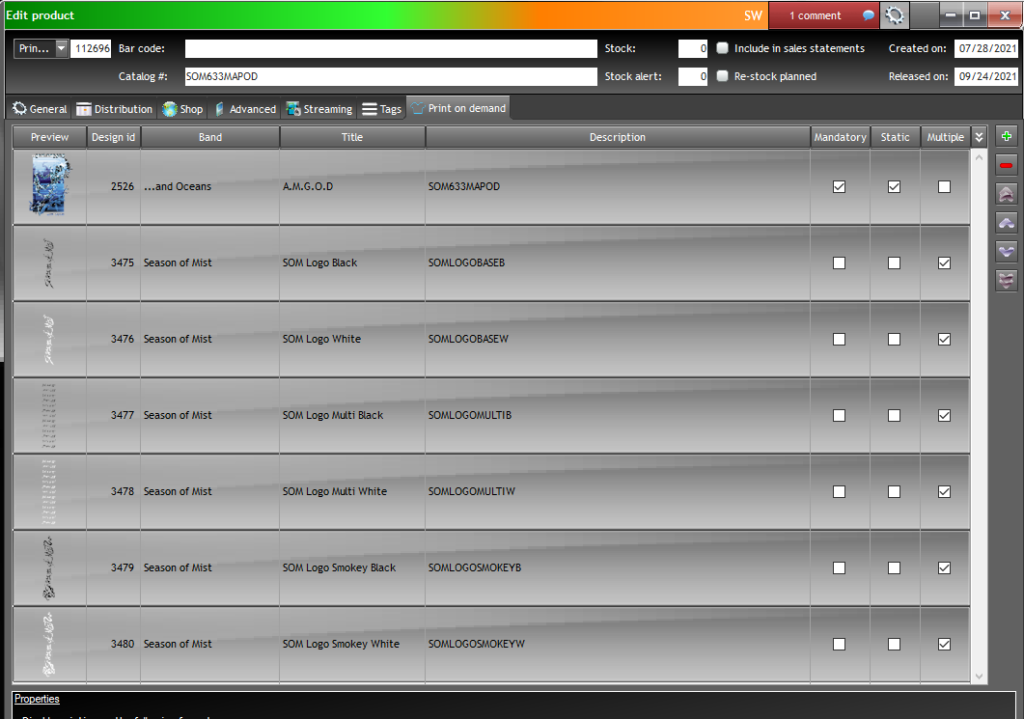
Here is an example :

The first design is thre main design. The 6 others are different SOM Design made to be available on sleeve and hood.
Before talking about “Design” are created, there’s 3 options here on each line.
- mandatory: when checked, the customer have to select this design. He can’t order this item without selecting this design. When Uncheked, the customer can remove it from the final product. As an example, we could add 2 main design, the first one with mandatory checked, and the 2nd design without mandatory checked. The result will be that the customer can disable the 2nd one from its final product.
- Static : It should be use to specify that the “main design” can be print only “in the same position” in the blank product. In the above example, If <Static> is checked, that design can be selected only for the front. If unchecked, the customer will have the possibility to set it to the back.
- Multiple: this is used to allow the same design selected “many times”. Typically, it’s for sleeve and hood. If you check the <multiple> box, that design could be selected on the left and on the right sleeve. For main design, we always want to uncheck multiple. If we check <multiple> the design could be print on the front AND on the back.
In summary, except on extremely rare case, the setup you can see above is the one you want :
Main design : mandatory + static
Accessory design: multiple
Now, maybe the more complicated section, the design edition.
Designs
As you probably understood, a design is a part of a printable product. A design represent …. a design 🙂
The best is to show you a “complex and concrete” example : Tristan did a “SOM Logo Smokey” Design, in 2 version, Black or White.
That smokey design, depending on “where it’s printed”, have different pictures. On the right, it’s the picture used for hood and short sleeve, while on the left it is the picture used for a long sleeve.

jkfnqsdjknfvsjdnvjnsdjvn
So, you can understands that the picture have to be different, depending “where it is printed”.
But, all of that have to be defined in only 1 design.
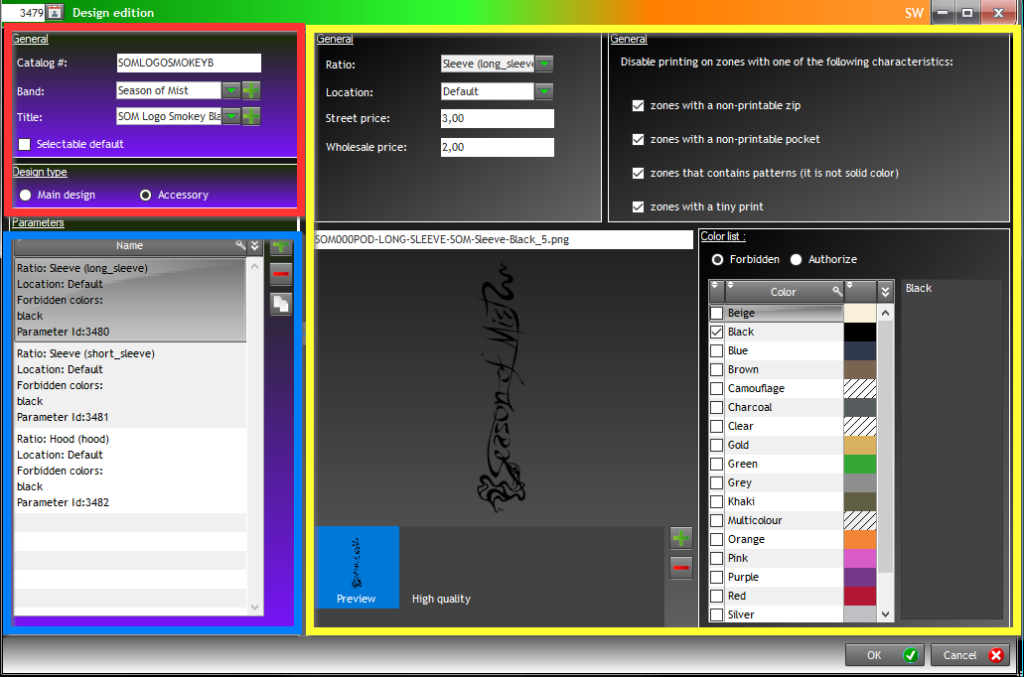
Here it’s how it works in the interface :

Let me explain that window.
- the red part is the general parameters.
- Title is important, because it’s used on the shop to fill the list.
- selectable by default : when checked this design is automatically selected when you display the page on the shop. It should be always checked for “band design”, and unchecked “SOM/SUA” design. By default, we want to select Archspire sleeve, and we never want to select a SOM sleeve by default.
- main / Accessory => according your selection, the design you create are will be available on “main zone” or “accessory zone”.
- the blue part : list of what I called “design parameters”.
- When you select 1 line in that list, the whole “yellow square parameter” have to be filled.
- Each line represent all settings that have to be used when the print occurs in the “current ratio”.
- Here, there’s 3 differents ratio : long sleeve, short sleeve, and hood. For each of them, all settings you can see in the yellow square have to be set.
- That design, because there’s 3 “ratio” defined in the will be selectable on “long sleeve”/”short sleeve”/”hood”
- The yellow square define all parameters used when this design is printed into the concerned ratio.
- Above, the long sleeve ratio is selected.
- Location is … not now ^^
- Prices … obvious.
- Colors autorization => you already now that.
- The restriction => you already now that.
- The picture selection. Not too complicate.
Prices for designs
- Main design :
- Street customer : 4€ / 4$
- Wholesale : 3€ / 3$
- Accessories design (sleeve / hood / etc) :
- There’s two differents case : the accessory can “promote” the label (a SOM logo for example) or the accessory “promote” the band (logo band for example)
- SOM / SUA Stuff :
- Street customer & wholesale : 2€ / 2$
- Band / Other stuff :
- Street customer & wholesale : 3€ / 3$
EPSON – Garment automatic
The software is used to send a TIFF to the printer without managing the settings to use.
Each Epson settings are stored/saved info GCR files.
To create them, I used Garment Creator, select all desired settings, and save them to the disk.
Before the DTG – v2 migration, all settings were in a “settings” folder, and named like that :

And before DTG – V2, the Epson Garment Automatic was configured to use all of them (one entry in the software for each setting).

Now, with the new version of the DTG system, there’s ONLY one entry (see below).
With the new DTG system, the interface need more settings: sleeve & hood need additionnal settings / print size.
And, Epson Garment Automatic have a bug: you can’t add more than 30 settings. That was the reason to remove all settings and manage them differently.
The new Garment Creator is now like this :

How it works ? The interface have all settings stored on the network. After selecting all parameters in the DTG wizzard, the interface will COPY the correct settings to the folder use by Espon Garment Automatic. Just after that, the interface will copy the correct TIFF.
Finally, the Epson Garment Cutomatic will print by using the 2 GCR/TIFF copied.
EPSON – Garment automatic – Manual mode
Sometimes you probably have to print a TIFF file without the interface. In that case, I have to find a better way, because now, It’s not optimal.
The only way to do this is :
- close Garment Automatic
- <search> the GCR file, copy it to the garment folder (the folder with only one settings).
- remove the other GCR file. It must contains only 1 GCR file.
- start Garment Automatic
- copy your tiff.
The problem is you have to Close/Open Garment as I said above before copying the GCR file because when the folder contains 0 or more than 1 settings, it remove the folder from the software’s listing …
I copied all settings to the Desktop, It’s a folder called <Epson Predefined Settings>, you can search the settings you want here.
Note: I have to do something in the interface so you don’t have to Close/Search/Remove/Start/Copy Tiff. I have a little idea for that. I will do that in the following days.